On Sunday I had a game of war of the roses using three lion rampant rules. This time we used the house rule that lets you move friendly units within 3 inches of each other. It was my first time playing like this, though my opponent brad has played a game like it before. Over all I think it works well and certainly made deployment more forgiving. While the added strategy from having to keep 3 inches between friendly units is interesting I don't feel that it adds to the game. It's certainly frustrating when you can't get a unit into combat because they can't get to choose to friendly units.
 |
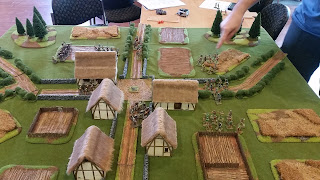
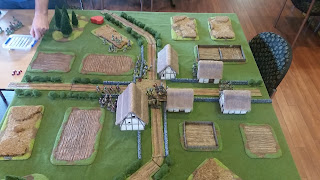
| The table before deployment. All the terrain here is brads, but built either by him or another friend of ours who does excellent work. The objective of this game is to hold the square (or more importantly the wounded noble in the center) for 5 turns (unit has to be in base contact for a whole turn) or until one force is defeated. |
 |
My forces. Consisting of 1x mounted men at arms, 2x foot sergeants, 2x archers (1 of which was elite)
My noble rolled Venerable (meaning he dies on 2 or 3) |
 |
Brads forces. Consisting of 1x men at arms, 1x mounted sergeants, 1x sergeants, 2x archers (1 of which was elite)
Brads noble rolled strong (which lets him reroll one attack dice per turn) |
 |
| Deployment |
 |
| Deployment |
 |
| Turn 1 started poorly for brad as he failed to activate most of his forces. I on the other hand got everything moving forward. |
 |
| Turn 2 see's more movement as I move the mounted men at arms towards the square, while brads mounted sergeants move around to the hedges (Our hedges are tall enough we make them impassible except where there are gaps. they also grant cover to mounted troops which the walls don't) |
 |
| The knights are lured forward by their wild charge (part of my plan as they're hard to move normally) and manage to smash the sergeants in their way, killing 3 for one of their own. |
 |
The knights are lured forward again this time managing to counter charge Brads men at arms as they charged in. This time I killed two while he killed another of my mounted men at arms from combat and one from archers in the field (on the left). It should also be mentioned that at this stage one of the casualties was my noble (I rolled a three). Luckily my other units hadn't lost anything and easily passed their batter test.
Meanwhile my archers (left) do nothing to his mounted sergeants due to the range and cover from the hedges, but my sergeants move up to threaten his. |
 |
| On the near side my sergeants have crossed into the road and shelter against a wall from Brads regular archers. |
 |
| Another angle of the above. |
 |
| More positioning, with my sergeants (right) moving to hold the square, and the second unit (left) moving to restrict the movement of the mounted sergeants and hopefully counter charge. |
 |
| The mounted sergeants fall back behind the hedge. As do Brads regular sergeants. My elite archers (in the buildings, near side of photo) had been picking off models over the last few turns. First point gained for holding the square. |
 |
| The elite archers and second unit of sergeants (left) move towards the square to gain a numbers advantage. Brads archers (right) jump the wall to try and batter the unit holding the square. Second point gained. |
 |
| The archers moved up to the wall to cover the troops moving on the square. Brads mounted sergeants once more jump through the hedge to threaten the flank. My second unit of sergeants move forward to give cover to the unit holding the square. Third point gained. |
 |
| The sergeants charge across the wall into Brads depleted sergeant unit. I lost the fight, and fell back, but due to the amount of casualties Brads sergeants turn tail and flee the field. Fourth point gained. |
At this point Brad conceded the match, though we played the last turn to see if he could batter my unit holding the square. He failed (like a lost of his dice rolls in this game) and we agreed that I had the numerical superiority on the square and he'd have struggled to keep me from gaining the last point anyway.
 |
| A view from where Brads archers look down the road into the square. Just visible behind the building is Brads men at arms where they sheltered from bow fire as they'd been depleted a lot from the combat with the knights. |
 |
| And last turn charge from Brad with the mounted sergeants into my archers. Unfortunately he rolled terribly and I won the fight! |
Overall a good game (for me) and terrible luck for Brad as he failed a few crucial turn activation's and I managed to pass most of mine. The few times I failed to activate didn't impact my movement too much.


Excellent stuff! I started by looking at the photos and realised I had seen all this scenery before!
ReplyDeleteCheers. :) They've both done some excellent work.
ReplyDeleteVery cool :)
ReplyDeleteCheers dude.
ReplyDelete